Java Unit 3 Notes BEU B.Tech | Inheritance, Interface, Package
Download Java Unit 3 notes for BEU B.Tech CSE 3rd semester. Covers Inheritance, Polymorphism, Abstract Class, Interface, Packages, super keyword, Object class, dynamic binding with simple explanations and examples as per new Bihar Engineering University syllabus.

Java Unit-3 is a very important unit for BTech CSE (AI & ML) students under Bihar Engineering University (BEU). This unit covers Inheritance, Polymorphism, Interfaces, and Packages, which are core Object Oriented Programming (OOP) concepts in Java. Questions from this unit are frequently asked in semester exams, theory papers, viva, and internal assessments.
These Java Unit-3 handwritten notes are specially prepared for BEU syllabus, keeping exam patterns, definitions, diagrams, and explanations in mind. The notes are written in easy language, with proper examples and code, so students can understand concepts quickly and revise effectively before exams. This unit is also important for students looking for Java handwritten notes PDF download for last-minute revision.
In this unit, students learn types of inheritance in Java, method overriding, compile-time and runtime polymorphism, dynamic binding, abstract classes, interfaces, multiple inheritance using interfaces, and packages in Java including creating packages, accessing packages, CLASSPATH, and import statements. All topics are explained in a step-by-step and exam-oriented way, making these notes suitable for semester exams and competitive preparation.
These notes are ideal for students searching for Java semester notes, BEU Java notes, handwritten Java notes PDF, and Java OOP concepts explained simply.
Inheritance in Java
Inheritance in Java is a core object-oriented programming concept where one class acquires the properties and methods of another class. The class that gives its data and behavior is called the superclass or parent class, and the class that receives and uses them is called the subclass or child class.
Inheritance helps us write less code, reuse existing logic, and build programs in a clear parent-child structure. It is mainly used to represent real-world relationships and plays a big role in runtime behavior like method overriding and polymorphism.
Inheritance allows code reuse, meaning the child class can directly use variables and methods of the parent class without rewriting them.
It creates an IS-A relationship, for example, Dog IS-A Animal.
Java supports single inheritance using classes, which means a class can extend only one class at a time.
A class that is inherited is called a superclass (parent class).
A class that inherits another class is called a subclass (child class).
The keyword used to inherit a class is
extends.Subclasses can add new methods and variables of their own.
Subclasses can also override methods of the parent class to change behavior.
Constructors are not inherited, but the parent constructor can be called using
super().Private members of a superclass are not directly accessible in a subclass.
Protected members are accessible within the same package and in subclasses.
Every class in Java automatically inherits from the Object class, even if it is not written explicitly.
Key Concepts
Superclass (Parent Class): The existing class whose features are inherited.
Subclass (Child Class): The new class that inherits from the superclass. It can use inherited members and add its own unique features.
extendsKeyword: This keyword is used to establish the inheritance link between classes. The syntax isclass Subclass extends Superclass { ... }."IS-A" Relationship: Inheritance represents an "is-a" relationship in real-world modeling, e.g., a "Car is a Vehicle" or a "Dog is an Animal".
Syntax
class ParentClass {
    // variables and methods
}

class ChildClass extends ParentClass {
    // additional variables and methods
}
Example
// Parent class
class Animal {

    // Instance variable
    String type = "Animal";

    // Method of parent class
    void sound() {
        System.out.println("Animal makes a sound");
    }
}

// Child class
class Dog extends Animal {

    // Child class method
    void showType() {
        // Accessing parent class variable
        System.out.println("Type: " + type);
    }

    // Overriding parent class method
    void sound() {
        System.out.println("Dog barks");
    }
}

// Main class
public class InheritanceDemo {
    public static void main(String[] args) {

        // Creating object of child class
        Dog d = new Dog();

        // Calling overridden method
        d.sound();

        // Calling child class method
        d.showType();
    }
}
Explanation
First, the Animal class is created as the parent class. It contains a variable type and a method sound(). Then the Dog class extends the Animal class using the extends keyword, which means Dog inherits all non-private members of Animal. Inside the Dog class, the sound() method is overridden to give Dog-specific behavior. In the main method, an object of Dog is created. When sound() is called, the Dog version runs, showing runtime behavior. The showType() method shows that the child class can directly access the parent class variable.
Why inheritance is important
It reduces duplicate code
It improves readability and structure
It supports runtime polymorphism
It makes programs easier to maintain and extend
Member Access Rules in Inheritance
Member access rules explain which variables and methods of a parent class can be used inside a child class. Java controls this using access modifiers so that data is shared safely. These rules help avoid misuse of data while still allowing inheritance to work properly.
Important member access rules
public members of a parent class are accessible everywhere, including in child classes inside or outside the package.
protected members are accessible inside the same package and also in child classes of other packages.
default (no modifier) members are accessible only within the same package and are not accessible in child classes of other packages.
private members of a parent class are not accessible directly in the child class.
Even though private members are not accessible, they still exist in memory as part of the parent object.
Parent class methods can access private members, and child classes can use those methods to indirectly work with private data.
Access rules apply to variables, methods, and constructors.
Constructors follow access rules but are never inherited.
summary table
public → accessible everywhere
protected → accessible in same package + subclasses
default → accessible only in same package
private → accessible only inside the same class
Example
class Parent {

    public int a = 10;
    protected int b = 20;
    int c = 30;          // default
    private int d = 40;

    // method to access private member
    void showPrivate() {
        System.out.println("Private value: " + d);
    }
}

class Child extends Parent {

    void showAccess() {

        System.out.println(a); // public → accessible
        System.out.println(b); // protected → accessible
        System.out.println(c); // default → accessible (same package)

        // System.out.println(d); // private → NOT accessible

        // accessing private member using parent method
        showPrivate();
    }
}

public class AccessRuleDemo {
    public static void main(String[] args) {

        Child obj = new Child();
        obj.showAccess();
    }
}
Output
10
20
30
Private value: 40
Explanation
In this example, the child class can directly access public, protected, and default members of the parent class because both classes are in the same package. The private variable cannot be accessed directly, but it can still be used through a parent class method. This shows how Java protects data while still supporting inheritance.
Types of inheritance in Java (using classes)
Single Inheritance
Multilevel Inheritance
Hierarchical Inheritance
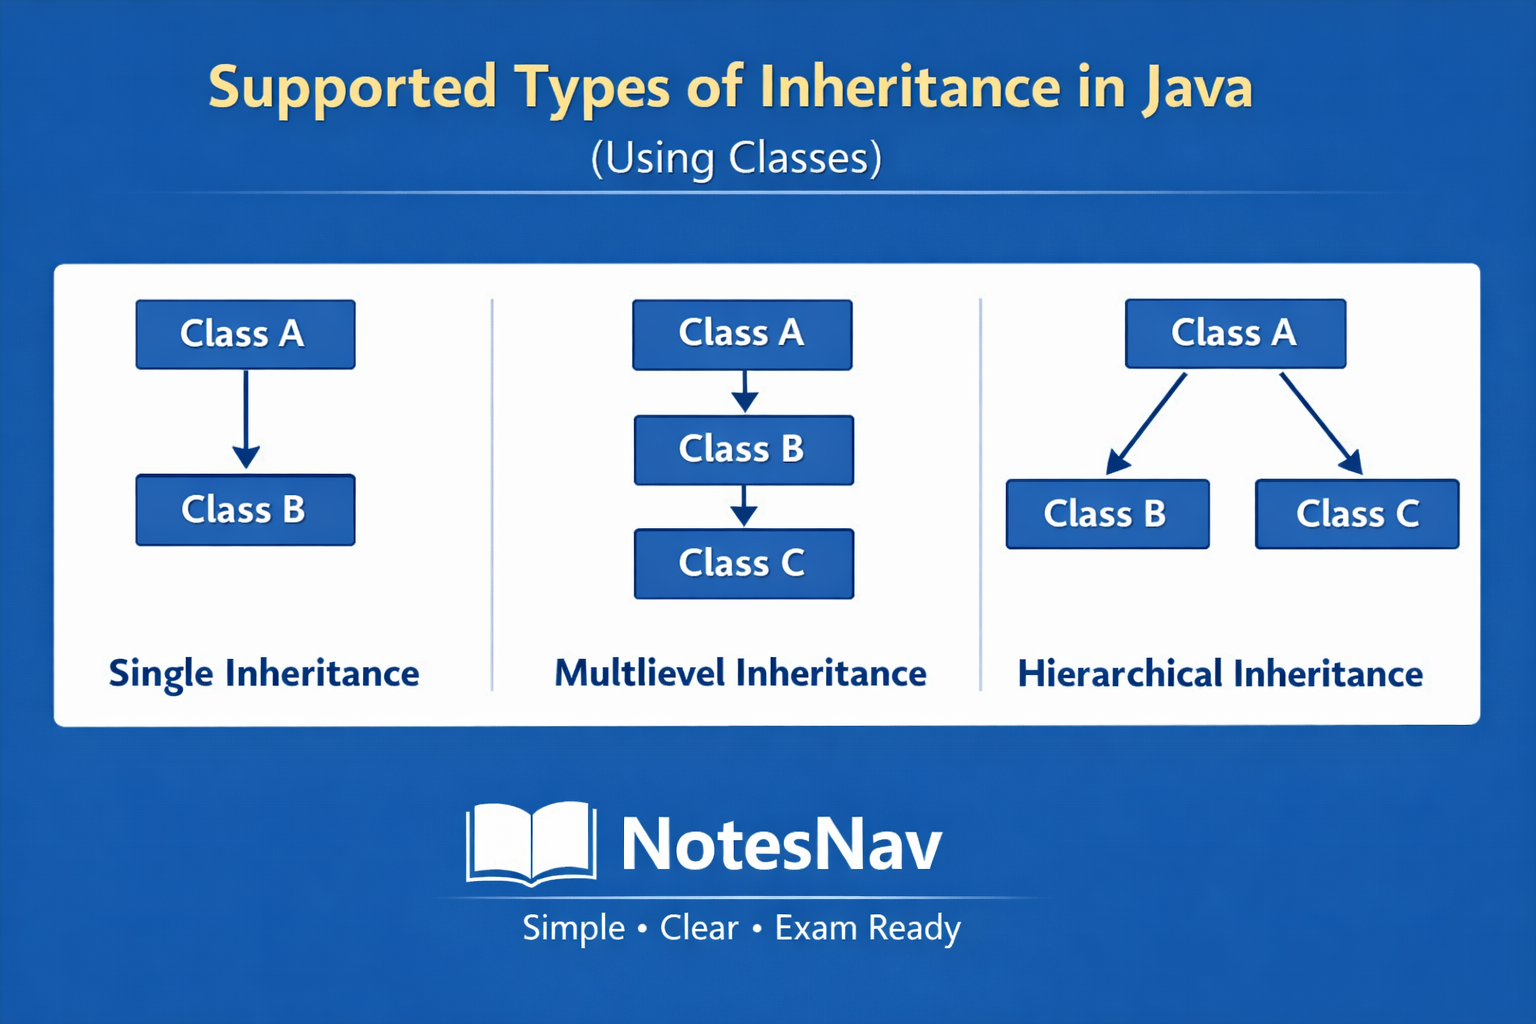
1. Single Inheritance
Single inheritance is a type of inheritance where a subclass or child inherits properties and behaviors from a single superclass or parent class.
In this mechanism, the child class can use the variables and methods of the parent class and can also add its own features. This makes the program simple, clear, and easy to manage. Single inheritance represents a basic IS-A relationship, where the child is a specialized form of the parent.
In single inheritance, there is only one superclass and one subclass
The subclass gets access to all non-private members of the superclass
It helps in code reusability because common code is written only once in the parent class
It improves readability and maintainability of the program
The child class can override methods of the parent class to change behavior
If the parent and child classes have a method with the same name and an object of the child class is created, the child class method is executed, not the parent one, because Java decides the method call at runtime based on the object.
If the child class wants to access the parent class method having the same name, it can be done using
super.methodName(), which explicitly calls the parent class method.Constructors of the parent class are not inherited, but they are executed using
super()Method calls in overridden methods are resolved at runtime, not compile time
Syntax
class ParentClass {
    // variables and methods
}

class ChildClass extends ParentClass {
    // additional variables and methods
}
Example
// Parent class
class Vehicle {

    int speed = 60;

    void run() {
        System.out.println("Vehicle is running");
    }
}

// Child class using single inheritance
class Bike extends Vehicle {

    void showSpeed() {
        // accessing parent class variable
        System.out.println("Speed is: " + speed);
    }
}

// Main class
public class SingleInheritanceDemo {
    public static void main(String[] args) {

        // creating object of child class
        Bike b = new Bike();

        // calling parent class method
        b.run();

        // calling child class method
        b.showSpeed();
    }
}
Explanation
When a subclass extends a superclass, it gains access to all the public and protected members of the parent class. private members are not inherited.
In this example, Vehicle is the parent class and Bike is the child class.
The Bike class inherits the speed variable and run()method from the Vehicle class using the extends keyword. Inside the main method, an object of Bike is created. Even though run() is defined in the parent class, it can be called using the child object.
This clearly shows how single inheritance allows a child class to reuse and extend the behavior of its parent.
Output
Vehicle is running
Speed is: 60
Case 1: When Parent and Child Have the Same Method Name (Method Overriding)
When both parent and child classes contain a method with the same name and same parameters, the child class provides its own version of that method. This is called method overriding. Java decides which method to execute at runtime, based on the object that is created.
Method name and parameters must be the same
Method overriding happens only in inheritance
The decision is taken at runtime
The method of the child class is executed
Reference type does not matter, object type matters
Example
class Vehicle {

    void run() {
        System.out.println("Vehicle is running");
    }
}

class Bike extends Vehicle {

    void run() {
        System.out.println("Bike is running");
    }
}

public class TestOverride {
    public static void main(String[] args) {

        Vehicle v = new Bike();
        v.run();
    }
}
Output
Bike is running
Explanation
Even though the reference is of type Vehicle, the object created is Bike. Java checks the object at runtime and executes the child class method. This is why the Bike method runs.
Case 2: How to Access Parent Class Method When Method Name Is the Same
If the child class overrides a method but still wants to use the parent class version, Java provides the super keyword. Using super, the child class can explicitly call the parent method.
superrefers to the immediate parent classUsed to access parent methods and variables
Helps avoid confusion when method names are the same
Can be used only inside the child class
Example
class Vehicle {

    void run() {
        System.out.println("Vehicle is running");
    }
}

class Bike extends Vehicle {

    void run() {
        System.out.println("Bike is running");

        // calling parent class method
        super.run();
    }
}

public class TestSuper {
    public static void main(String[] args) {

        Bike b = new Bike();
        b.run();
    }
}
Output
Bike is running
Vehicle is running
Explanation
First, the child class method runs. Inside it, super.run() is used to call the parent class method. This allows both behaviors to execute in a controlled way.
Exam-ready summary (very important)
Same method in parent and child → child method runs
Decision is taken at runtime
To call parent method → use
super.methodName()
2. Multilevel Inheritance
Multilevel inheritance is a type of inheritance where one class inherits from another class, and then a third class inherits from that second class.
In this structure, inheritance happens in levels, forming a chain. The lowest child class gets access to the properties and methods of all the classes above it. This helps in building step-by-step specialization and clearly represents real-world hierarchies.
In multilevel inheritance, there are more than two classes connected in a chain
Each child class inherits features from its immediate parent class
The lowest subclass indirectly inherits members of all ancestor classes
It supports code reuse at multiple levels
Changes in the top-level parent affect all derived classes
Method overriding can happen at any level in the hierarchy
Constructors are executed from top to bottom using
super(). Means execution sequence from parent to child and calling sequence from child to parent.
Syntax
class A {
    // variables and methods
}

class B extends A {
    // variables and methods
}

class C extends B {
    // variables and methods
}
Example
// Grandparent class
class Animal {

    void eat() {
        System.out.println("Animal eats food");
    }
}

// Parent class
class Dog extends Animal {

    void bark() {
        System.out.println("Dog barks");
    }
}

// Child class
class Puppy extends Dog {

    void weep() {
        System.out.println("Puppy weeps");
    }
}

// Main class
public class MultilevelInheritanceDemo {
    public static void main(String[] args) {

        // creating object of the lowest child class
        Puppy p = new Puppy();

        // calling method of grandparent class
        p.eat();

        // calling method of parent class
        p.bark();

        // calling method of child class
        p.weep();
    }
}
Output
Animal eats
Dog barks
Puppy playsExplanation
In this example, Animal is the top-level class, Dog is derived from Animal, and Puppy is derived from Dog. This forms a multilevel inheritance chain. When an object of Puppy is created, it can access methods from Animal, Dog, and Puppy. This shows that the child at the last level inherits properties from all the classes above it in the hierarchy.
3. Hierarchical Inheritance
Hierarchical inheritance is a type of inheritance where multiple child classes inherit from the same parent class.
In this structure, the parent class contains common features, and each child class uses those features in its own way. This helps in sharing common code while still allowing different behaviors in different child classes.
One parent class and more than one child class are involved
All child classes inherit common members from the same parent
Each child class can have its own additional methods
It supports code reuse by keeping common code in one place
Changes in the parent class affect all child classes
Method overriding can be done independently in each child class
Syntax
class Parent {
    // common members
}

class Child1 extends Parent {
    // specific members
}

class Child2 extends Parent {
    // specific members
}
Example
// Parent class
class Animal {

    void eat() {
        System.out.println("Animal eats food");
    }
}

// First child class
class Dog extends Animal {

    void bark() {
        System.out.println("Dog barks");
    }
}

// Second child class
class Cat extends Animal {

    void meow() {
        System.out.println("Cat meows");
    }
}

// Main class
public class HierarchicalDemo {
    public static void main(String[] args) {

        // object of first child
        Dog d = new Dog();
        d.eat();
        d.bark();

        // object of second child
        Cat c = new Cat();
        c.eat();
        c.meow();
    }
}
Output
Animal eats food
Dog barks
Animal eats food
Cat meows
Explanation
Here, Animal is the parent class. Both Dog and Cat inherit from Animal.
This means both child classes can use the eat()method of the parent class. At the same time, each child class has its own behavior: Dog can bark and Cat can meow.
This clearly shows how one parent class can serve multiple child classes in hierarchical inheritance.
super Keyword in Java
The super keyword is used in inheritance to refer to the immediate parent class. It helps the child class access parent class members when there is a name conflict or when the parent part must be initialized first.
The super keyword is mainly used to call parent class variables, parent class methods, and parent class constructors.
Important concepts and points of super keyword
superrefers to the immediate parent class, not any higher-level classIt is used only inside a child class
It helps resolve name conflicts between parent and child
It is commonly used in method overriding cases
It is also used to call parent class constructors
super()must be the first statement inside a child constructorIt cannot be used inside a static context
It improves clarity when parent and child have same member names
Use 1: Accessing Parent Class Variable using super
When parent and child have variables with the same name, super is used to access the parent variable.
class Parent {
    int x = 10;
}

class Child extends Parent {
    int x = 20;

    void show() {
        System.out.println(x);        // child variable
        System.out.println(super.x);  // parent variable
    }
}

public class TestSuperVar {
    public static void main(String[] args) {
        Child obj = new Child();
        obj.show();
    }
}
Output
20
10
The child class has its own x. Without super, Java accesses the child variable. Using super.x, Java is told to use the parent variable.
Use 2: Accessing Parent Class Method using super
When a child overrides a parent method, super.methodName() is used to call the parent version.
class Vehicle {
    void run() {
        System.out.println("Vehicle is running");
    }
}

class Bike extends Vehicle {
    void run() {
        System.out.println("Bike is running");
        super.run(); // calling parent method
    }
}

public class TestSuperMethod {
    public static void main(String[] args) {
        Bike b = new Bike();
        b.run();
    }
}
Output
Bike is running
Vehicle is running
First, the child method runs. Then super.run() explicitly calls the parent method with the same name.
Use 3: Calling Parent Class Constructor using super()
super() is used to call the parent class constructor. It is called automatically if not written.
class Parent {
    Parent() {
        System.out.println("Parent constructor");
    }
}

class Child extends Parent {
    Child() {
        super(); // must be first statement
        System.out.println("Child constructor");
    }
}

public class TestSuperConstructor {
    public static void main(String[] args) {
        Child obj = new Child();
    }
}
Output
Parent constructor
Child constructor
When a child object is created, Java first calls the parent constructor using super(). This ensures the parent part is initialized before the child.
Exam-ready summary
super.variable→ access parent variablesuper.method()→ access parent methodsuper()→ call parent constructorParent constructor runs before child constructor
Constructor in Inheritance
Constructor in inheritance explains how constructors of parent and child classes are executed when an object of the child class is created. Even though constructors are not inherited, they play an important role in inheritance because the parent part of an object must be initialized before the child part. For this reason, Java always executes the parent class constructor first and then the child class constructor.
Constructors are not inherited by child classes
When a child class object is created, the parent class constructor executes first
After the parent constructor finishes, the child constructor executes
Java automatically inserts
super()in the child constructor if it is not writtensuper()is used to call the immediate parent class constructorsuper()must be the first statement in the child constructorIf the parent has a parameterized constructor, the child must call it using
super(arguments)Constructor execution follows the inheritance hierarchy from top to bottom
Syntax of Constructor in Inheritance
class Parent {
    Parent() {
        // parent constructor
    }
}

class Child extends Parent {
    Child() {
        super(); // optional if parent has no-arg constructor
        // child constructor
    }
}
Example
// Parent class
class Parent {

    Parent() {
        System.out.println("Parent constructor");
    }
}

// Child class
class Child extends Parent {

    Child() {
        // calling parent constructor
        super();
        System.out.println("Child constructor");
    }
}

// Main class
public class ConstructorDemo {
    public static void main(String[] args) {

        // creating object of child class
        Child obj = new Child();
    }
}
Output
Parent constructor
Child constructor
Explanation
When the object of the Child class is created, Java first calls the constructor of the Parent class using super(). This initializes the parent part of the object. After that, the child class constructor runs and completes the object creation. This order is fixed and always followed in inheritance.
Passing Arguments and Constructor Selection
In inheritance, a parent class may have more than one constructor. When a child class object is created, Java must decide which parent constructor to call. This decision is made at compile time, based on the arguments passed using super(arguments) inside the child constructor. If the correct constructor is not called, the program will not compile.
Parent classes can have multiple constructors (constructor overloading)
Child constructors use
super(arguments)to call a specific parent constructorThe compiler decides which parent constructor to call
The decision depends on the number and type of arguments passed
If no
super()is written, the compiler tries to call the no-argument parent constructorIf the parent has no default constructor,
super(arguments)becomes mandatorysuper(arguments)must always be the first statement in the child constructor
Example: Passing arguments to parent constructor
// Parent class
class Parent {

    Parent() {
        System.out.println("Parent default constructor");
    }

    Parent(int x) {
        System.out.println("Parent parameterized constructor: " + x);
    }
}

// Child class
class Child extends Parent {

    Child() {
        // compiler calls Parent() automatically
        System.out.println("Child default constructor");
    }

    Child(int y) {
        // explicitly calling parameterized parent constructor
        super(y);
        System.out.println("Child parameterized constructor: " + y);
    }
}

// Main class
public class ConstructorArgDemo {
    public static void main(String[] args) {

        // calls Parent() then Child()
        Child c1 = new Child();

        // calls Parent(int) then Child(int)
        Child c2 = new Child(10);
    }
}
Output
Parent default constructor
Child default constructor
Parent parameterized constructor: 10
Child parameterized constructor: 10
Explanation
In the first object creation, Child() is called. Since no super() is written, the compiler automatically inserts super() and calls the parent’s default constructor. In the second case, Child(int) explicitly uses super(y), so the compiler matches it with Parent(int) and calls that constructor. This shows that constructor selection is decided at compile time, based on the arguments passed.
Very important exam point
Constructor calling in inheritance is resolved at compile time, and the parent constructor is selected based on the arguments passed to super().
Preventing Inheritance in Java (final classes and final methods)
Java allows inheritance by default, but sometimes we do not want a class or method to be inherited or modified. To control this, Java provides the final keyword. Using final, we can stop inheritance at the class level or stop method overriding at the method level. This is mainly done for security, consistency, and design control.
Final class
A final class is a class that cannot be inherited by any other class. Once a class is declared as final, no child class can extend it. This is useful when the class design should remain fixed and unchanged.
A final class cannot be extended
Used to prevent misuse or unwanted modification
Improves security and stability
Commonly used in utility classes
Example:
// final class
final class A {
    void show() {
        System.out.println("This is a final class");
    }
}

// This will cause compile-time error
// class B extends A { }
Here, class A is final, so Java does not allow any class to inherit it. Trying to extend it will give a compile-time error.
Final method
A final method is a method that cannot be overridden in the child class. The child class can inherit the method, but it cannot change its implementation.
Final methods can be inherited
Final methods cannot be overridden
Used when method behavior must remain same
Decision is enforced at compile time
Example:
class Parent {

    final void display() {
        System.out.println("This is a final method");
    }
}

class Child extends Parent {

    // This will cause compile-time error
    // void display() {
    //     System.out.println("Trying to override");
    // }
}
Explanation:
The display() method is final in the parent class, so the child class cannot override it. Java stops this at compile time.
Very important exam points
final class→ prevents inheritancefinal method→ prevents method overridingFinal methods still support inheritance but not modification
Object Class and Its Methods
The Object class is the root class of Java. Every class in Java automatically inherits from the Object class, even if we do not write it explicitly. Because of this, all Java objects have access to the methods defined in the Object class.
It is present in
java.langpackageIt is the superclass of all classes
No class can exist without extending Object
Methods of Object class are available to every object
Important methods of Object class
toString()
Returns a string representation of the object. It is commonly overridden to display meaningful information.equals(Object obj)
Used to compare two objects for logical equality.hashCode()
Returns a hash value for the object. Used in hashing collections.getClass()
Returns the runtime class of the object.clone()
Creates and returns a copy of the object.finalize()
Called by garbage collector before object removal (deprecated in modern Java).
Example: Object class method
class Student {

    String name = "Sonu";

    public String toString() {
        return "Student name: " + name;
    }
}

public class ObjectDemo {
    public static void main(String[] args) {

        Student s = new Student();
        System.out.println(s.toString());
    }
}
Output
Student name: Sonu
Explanation
Here, the Student class overrides the toString() method of the Object class. When the object is printed, Java automatically calls toString(), giving meaningful output instead of a memory reference.
Exam-ready summary
Inheritance can be prevented using
finalFinal class → cannot be inherited
Final method → cannot be overridden
Object class is the parent of all classes
Common Object methods:
toString(),equals(),hashCode()
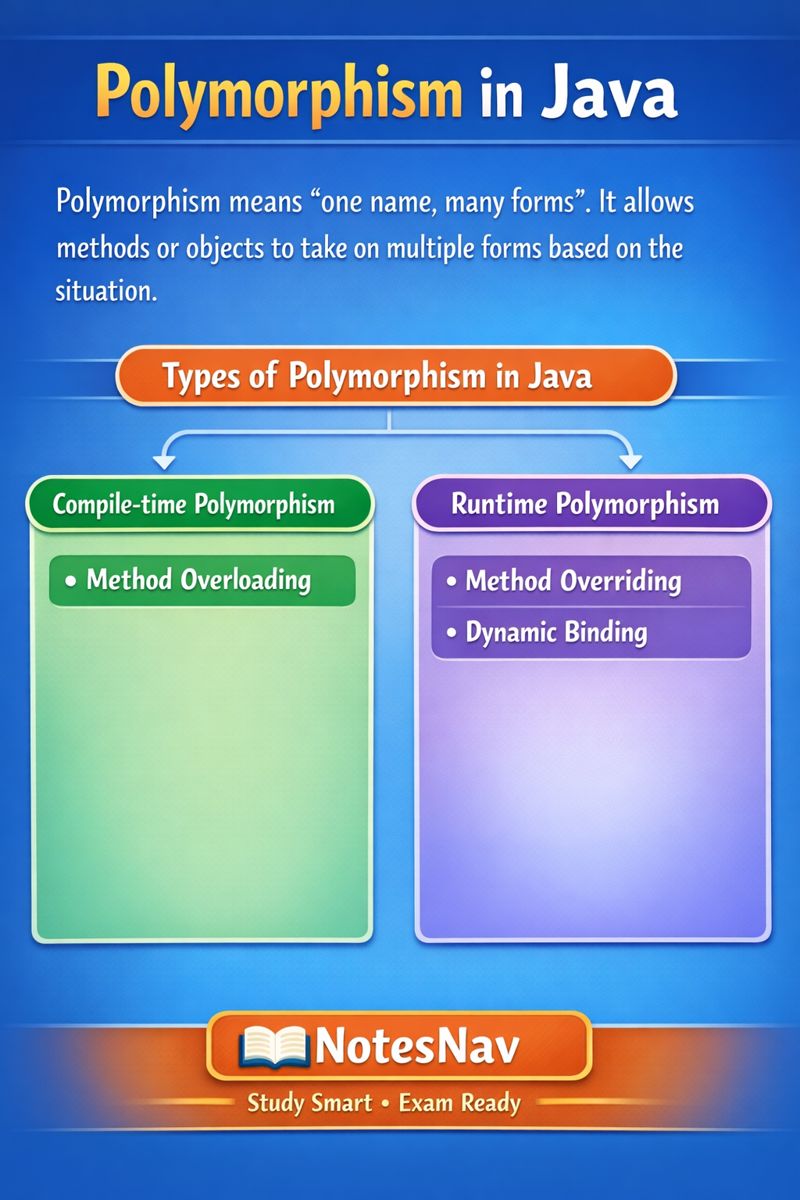
Polymorphism in Java
Polymorphism means one name, many forms. In Java, it refers to the ability of the same method or object to behave differently in different situations.
This mainly happens when a parent class reference is used to refer to child class objects, and Java decides the correct behavior either at compile time or at runtime.
Polymorphism makes programs flexible, reusable, and easy to extend.
Types of Polymorphism in Java
Compile-time Polymorphism
Method Overloading
Runtime Polymorphism
Method Overriding
Dynamic Binding
Compile-time Polymorphism
Compile-time polymorphism in java is a type of polymorphism in which the Java compiler decides which method will be executed before the program starts running.
This happens when a class contains more than one method with the same name but different parameters.
The compiler looks at the arguments used in the method call and selects the matching method during compilation, so the decision does not depend on the object created at runtime.
Important concepts
Compile-time polymorphism is also called static polymorphism because the method call is fixed at compile time and does not change during execution.
It is achieved using method overloading, where multiple methods have the same name but differ in their parameter list.
The difference between overloaded methods can be in the number of parameters, the type of parameters, or the order of parameters, which helps the compiler identify the correct method.
The method selection is done before program execution, so Java does not wait for the object to be created to decide which method to run.
Object type and runtime behavior do not affect compile-time polymorphism, making it different from method overriding.
Since the decision is already made by the compiler, this type of polymorphism is generally faster than runtime polymorphism.
Method Overloading in Java
Method overloading is a feature in Java where more than one method in the same class has the same name but different parameter lists.
The purpose of overloading is to perform similar operations using the same method name while allowing different inputs. Java decides which overloaded method to call at compile time, based on the arguments provided in the method call.
Method overloading allows multiple methods with the same name to exist in one class, which improves code readability and reuse.
The methods must differ in their parameter list, which can be a difference in the number of parameters, the type of parameters, or the order of parameters.
The return type alone cannot be used to overload a method; the parameter list must be different.
Method overloading is an example of compile-time polymorphism because the compiler decides which method to call.
Overloading can occur within the same class or between parent and child classes.
Static methods can also be overloaded because overloading does not depend on runtime behavior.
General Syntax
class ClassName {

    methodName(parameters) {
        // code
    }

    methodName(different parameters) {
        // code
    }
}
The method name remains the same, but the parameter list must be different.
Example of Method Overloading
This is a simple general example that shows how method overloading works in Java using the same method name with different parameters.
class Example {

    // method with one parameter
    void show(int a) {
        System.out.println("Value of a: " + a);
    }

    // method with two parameters
    void show(int a, int b) {
        System.out.println("Value of a and b: " + a + ", " + b);
    }
}

public class OverloadingDemo {
    public static void main(String[] args) {

        Example obj = new Example();

        // calling overloaded methods
        obj.show(5);
        obj.show(5, 10);
    }
}
Output
Value of a: 5
Value of a and b: 5, 10
Explanation
Both methods are named show, but they have different parameter lists. When obj.show(5) is called, the compiler selects the method with one parameter. When obj.show(5, 10) is called, the compiler selects the method with two parameters.
This decision is made at compile time, which clearly demonstrates method overloading.
Types of Method Overloading
Method overloading can be classified based on how the parameter list differs.
Overloading by number of parameters
In this type, methods have the same name but a different count of parameters. The compiler selects the method by checking how many arguments are passed.Overloading by type of parameters
In this case, methods have the same name and same number of parameters, but the parameter data types are different. The compiler matches the argument types with the method definition.Overloading by order of parameters
Here, methods have the same name and same parameter types, but the order of parameters is different. The compiler considers the sequence of arguments to decide the method call.
Type 1: Overloading by Number of Parameters
Example
class Calculator {

    // method with two parameters
    int add(int a, int b) {
        return a + b;
    }

    // method with three parameters
    int add(int a, int b, int c) {
        return a + b + c;
    }
}

public class OverloadNumber {
    public static void main(String[] args) {

        Calculator calc = new Calculator();

        System.out.println(calc.add(10, 20));
        System.out.println(calc.add(10, 20, 30));
    }
}
Output
30
60
Explanation
Both methods are named add, but one accepts two parameters and the other accepts three. The compiler checks the number of arguments in the method call and selects the matching method during compilation.
Type 2: Overloading by Type of Parameters
Example
class Calculator {

    // method with int parameters
    int add(int a, int b) {
        return a + b;
    }

    // method with double parameters
    double add(double a, double b) {
        return a + b;
    }
}

public class OverloadType {
    public static void main(String[] args) {

        Calculator calc = new Calculator();

        System.out.println(calc.add(5, 10));
        System.out.println(calc.add(5.5, 2.5));
    }
}
Output
15
8.0
Explanation
Here, both methods have the same name and number of parameters, but the parameter types are different. The compiler decides which method to call by checking the data types of the arguments.
Type 3: Overloading by Order of Parameters
Example
class Display {

    // int first, String second
    void show(int a, String b) {
        System.out.println(a + " " + b);
    }

    // String first, int second
    void show(String b, int a) {
        System.out.println(b + " " + a);
    }
}

public class OverloadOrder {
    public static void main(String[] args) {

        Display d = new Display();

        d.show(10, "Java");
        d.show("Java", 10);
    }
}
Output
10 Java
Java 10
Explanation
Both methods have the same name and same parameter types, but the order of parameters is different. The compiler uses the sequence of arguments in the method call to select the correct method.
Runtime Polymorphism in Java
Runtime polymorphism is a type of polymorphism where the method to be executed is decided at runtime, not at compile time. This happens when a parent class reference refers to a child class object and the method being called is overridden in the child class. Java checks the actual object created during program execution and then calls the appropriate method. This makes programs flexible and supports dynamic behavior.
Runtime polymorphism is also called dynamic polymorphism because the decision is made while the program is running.
It is achieved using method overriding, where a child class provides its own implementation of a parent class method.
Inheritance is mandatory for runtime polymorphism to work.
The method call is resolved based on the object type, not the reference type.
The decision is taken by the JVM at runtime, not by the compiler.
Only instance methods participate in runtime polymorphism; static methods do not.
Runtime polymorphism supports dynamic binding, where method binding happens during execution.
It improves flexibility and extensibility of programs.
Syntax idea of Runtime Polymorphism
Parent ref = new Child();
ref.method();
Example
// Parent class
class Shape {

    void draw() {
        System.out.println("Drawing a shape");
    }
}

// Child class
class Circle extends Shape {

    // overriding parent method
    void draw() {
        System.out.println("Drawing a circle");
    }
}

// Main class
public class RuntimePolyDemo {
    public static void main(String[] args) {

        // parent reference, child object
        Shape s = new Circle();

        // runtime decision
        s.draw();
    }
}
Output
Drawing a circle
Explanation
Here, the reference type is Shape, but the object created is Circle. When draw() is called, Java does not decide the method at compile time. Instead, the JVM checks the object at runtime and finds that it is a Circle, so it executes the draw() method of the Circle class. This behavior is called runtime polymorphism.
Method Overriding
Method overriding is a feature of Java where a a child class changes the behavior of a method that it gets from the parent class. The method in the child class must have the same name, same parameters, and same return type as the parent class method.
Java decides which method to execute at runtime, based on the object created.
Method overriding happens only in inheritance.
The method name and parameter list must be exactly the same in both parent and child classes.
If both parent and child have the same method and the object created is of the child class, Java always runs the child method.
The access level of the overridden method cannot be more restrictive than the parent method.(cannot be more restrictive), that
final,static, andprivatemethods cannot be overridden.Method overriding supports runtime polymorphism.
The decision of which method runs is taken at runtime, not compile time.
The method call depends on the object type, not the reference type.
Static methods cannot be overridden; they are hidden.
Final methods cannot be overridden.
Constructors cannot be overridden.
Syntax
class Parent {
    void show() {
        // parent implementation
    }
}

class Child extends Parent {
    void show() {
        // child implementation
    }
}
Example
// Parent class
class Animal {

    void sound() {
        System.out.println("Animal makes sound");
    }
}

// Child class
class Dog extends Animal {

    // overriding parent method
    void sound() {
        System.out.println("Dog barks");
    }
}

// Main class
public class OverrideDemo {
    public static void main(String[] args) {

        // parent reference, child object
        Animal a = new Dog();

        // runtime method call
        a.sound();
    }
}
Output
Dog barks
Explanation
When this program runs, the reference type is Animal, but the object created is Dog. At runtime, Java checks the object type and finds that it is a Dog. Because the sound() method is overridden in the Dog class, the JVM executes the child class method. That is why the output is Dog barks instead of Animal makes sound.
Dynamic Binding in Java
Dynamic binding is a concept in Java that explains how Java decides which overridden method to execute at runtime. It is the mechanism used by the JVM to link a method call with the correct method implementation based on the actual object created. Dynamic binding does not define a method; it only explains how the method call is resolved during execution.
Dynamic binding explains the process of method selection, not method definition.
It works only when method overriding exists.
The JVM decides the method call at runtime, not at compile time.
The decision is based on the object type, not the reference type.
Dynamic binding is the reason runtime polymorphism works in Java.
It applies only to instance methods.
Static methods are not dynamically bound because they are resolved at compile time.
Syntax
Parent reference = new Child();
reference.methodName();
Example
class Animal {

    void sound() {
        System.out.println("Animal makes sound");
    }
}

class Dog extends Animal {

    // overridden method
    void sound() {
        System.out.println("Dog barks");
    }
}

public class DynamicBindingTest {
    public static void main(String[] args) {

        // parent reference holding child object
        Animal a = new Dog();

        // method call resolved at runtime
        a.sound();
    }
}
Output
Dog barks
Explanation
In this program, method overriding defines two versions of the sound() method. Dynamic binding is the runtime mechanism that allows the JVM to choose the correct version. When the program runs, the JVM checks the object type (Dog) and binds the method call to the sound() method of the Dog class.
VERY IMPORTANT DIFFERENCE
Method Overriding
Method overriding is about writing a method in the child class with the same name and parameters as the parent class method. It is a coding concept used by the programmer.
Dynamic Binding
Dynamic binding is about executing the method at runtime. It is a JVM concept that decides which overridden method should run.
Abstract Class in Java
An abstract class in Java is a class that cannot be instantiated and is mainly used to represent a base class that provides common structure for its child classes. An abstract class in Java is a class whose object cannot be created.
An abstract class is declared using the
abstractkeyword.An abstract class cannot be used to create objects directly.
An abstract class may contain abstract methods (methods without a body) as well as normal methods.
An abstract method has no body, only method declaration.
If a class contains at least one abstract method, the class must be abstract.
A child class must override all abstract methods of the abstract class, otherwise the child class becomes abstract and due to this we also not able to create obj of the child class.
Abstract classes are used to achieve partial abstraction.
Abstract classes support inheritance and runtime polymorphism.
Constructors are allowed in abstract classes and are called during object creation of child classes.
Syntax
abstract class ClassName {

    abstract void methodName(); // abstract method

    void normalMethod() {
        // method body
    }
}
Example
// Abstract class
abstract class Shape {

    // abstract method
    abstract void draw();

    // normal method
    void info() {
        System.out.println("This is a shape");
    }
}

// Child class
class Circle extends Shape {

    // implementing abstract method
    void draw() {
        System.out.println("Drawing a circle");
    }
}

// Main class
public class AbstractDemo {
    public static void main(String[] args) {

        // parent reference, child object
        Shape s = new Circle();

        // calling methods
        s.draw();
        s.info();
    }
}
Output
Drawing a circle
This is a shape
Explanation
Here, Shape is an abstract class that defines an abstract method draw(). The class Circle extends Shape and provides the implementation of the draw() method. We cannot create an object of Shape, but we can create an object of Circle using a Shape reference. At runtime, Java executes the draw() method of the Circle class, which shows how abstract classes support runtime polymorphism.
Abstract Method
An abstract method is a method without a body that is declared in an abstract class. It defines only the method name and parameters, not the implementation.
When a child class inherits an abstract class, it must override the abstract method and provide its own implementation. Because of this overriding, when the method is called using a parent reference, the child class method is executed, not the abstract one.
An abstract method is declared using the
abstractkeyword and does not have a body.If a class contains even one abstract method, the class must be declared as abstract class.
A child class must override all abstract methods of the parent abstract class.
The abstract method in the parent class is never executed, because it has no body.
When the overridden method is called, the child class implementation runs, not the parent abstract method.
This behavior happens due to method overriding and dynamic binding.
Abstract methods are a clear example of runtime polymorphism.
Example to understand overriding of abstract method
abstract class Animal {

    // abstract method (no body)
    abstract void sound();
}

class Dog extends Animal {

    // overriding abstract method
    void sound() {
        System.out.println("Dog barks");
    }
}

public class AbstractMethodDemo {
    public static void main(String[] args) {

        // parent reference, child object
        Animal a = new Dog();

        // overridden method is called
        a.sound();
    }
}
Output
Dog barks
Explanation
In this example, the sound() method in the Animal class is abstract, so it has no implementation. The Dog class overrides this method and provides the method body. When a.sound() is called, Java uses dynamic binding to decide which method to execute. Since the object created is of type Dog, the overridden method in the Dog class is executed. The abstract method in the parent class is never executed.
Constructor in Abstract Class
An abstract class can have a constructor, even though its object cannot be created directly. The main purpose of a constructor in an abstract class is to initialize data members of the abstract class.
When an object of a child class is created, the constructor of the abstract parent class is automatically executed first. In this way, the constructor of an abstract class is called indirectly through its child class.
An abstract class can have a constructor, just like a normal class.
We cannot create an object of an abstract class directly.
When an object of the child class is created, the abstract parent class constructor is executed first.
Java internally uses
super()to call the parent constructor.If
super()is not written in the child constructor, the compiler automatically inserts it.The parent (abstract class) constructor always executes before the child class constructor.
Constructors in abstract classes are used for initialization, not for method overriding.
An abstract class can have parameterized constructors, and values can be passed from the child class.
Syntax of Constructor in Abstract Class
abstract class Parent {

    Parent() {
        // parent constructor
    }
}

class Child extends Parent {

    Child() {
        super(); // implicit or explicit
        // child constructor
    }
}
Example: Abstract Class Constructor (without explicit super)
// Abstract parent class
abstract class Animal {

    Animal() {
        System.out.println("Animal constructor called");
    }

    abstract void sound();
}

// Child class
class Dog extends Animal {

    Dog() {
        System.out.println("Dog constructor called");
    }

    void sound() {
        System.out.println("Dog barks");
    }
}

// Main class
public class AbstractConstructorDemo {
    public static void main(String[] args) {

        // creating object of child class
        Dog d = new Dog();
    }
}
Output
Animal constructor called
Dog constructor called
Explanation
When the object of Dog is created, Java first calls the constructor of the abstract parent class Animal. After the parent constructor finishes execution, the constructor of the Dog class is executed. Even though we cannot create an object of an abstract class directly, its constructor always runs during child object creation.
Constructor in Abstract Class (Using super)
The constructor of an abstract class can also be called explicitly using super(). When the abstract class has a parameterized constructor, the child class must use super(arguments) to pass values to the parent constructor. The super() call must always be the first statement inside the child constructor.
super()is used to call the abstract parent class constructor.super()must be written as the first statement in the constructor.If the abstract class has a parameterized constructor, calling
super(arguments)is mandatory.Parent constructor execution always happens before child constructor execution.
Example: Abstract Class Constructor using super()
// Abstract parent class
abstract class Person {

    Person(String name) {
        System.out.println("Person constructor called");
        System.out.println("Name: " + name);
    }
}

// Child class
class Student extends Person {

    Student(String name) {
        super(name); // calling abstract parent constructor
        System.out.println("Student constructor called");
    }
}

// Main class
public class SuperAbstractDemo {
    public static void main(String[] args) {

        // creating child object
        Student s = new Student("Sonu");
    }
}
Output
Person constructor called
Name: Sonu
Student constructor called
Explanation
In this example, Person is an abstract class with a parameterized constructor. When the Student object is created, the super(name) statement calls the constructor of the abstract parent class first. After the parent constructor completes, the child class constructor is executed. This shows how super() is used to call constructors of abstract classes.
Key Characteristics
Cannot be Instantiated: You cannot create a direct object of an abstract class using the
newkeyword.Abstract Methods: An abstract class can have abstract methods, which are methods declared without an implementation (no method body).
Concrete Methods: It can also have regular, non-abstract (concrete) methods with full implementations that subclasses can inherit or override.
Constructors and Fields: Abstract classes can have constructors, fields (variables), static methods, and final methods, just like a normal class. The constructor is called when an instance of a concrete subclass is created.
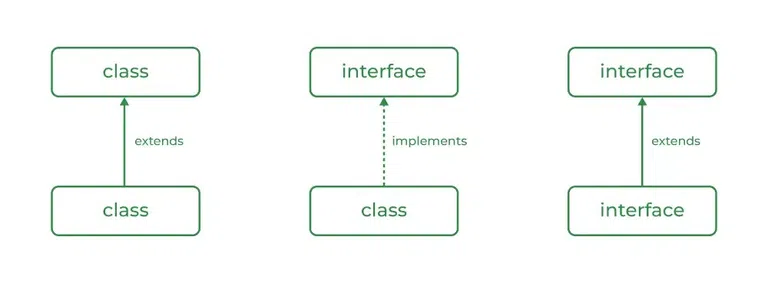
Inheritance: To use an abstract class, another class must
extendit. The first concrete (non-abstract) subclass must provide implementations for all inherited abstract methods, or it must also be declaredabstract.Single Inheritance: A class can only extend one abstract class in Java, as Java does not support multiple inheritance of classes.
Interface in Java
An interface in Java is a blueprint of a class that is used to achieve complete abstraction. It contains only method declarations and constants, not method implementations.
An interface tells a class what to do, but not how to do it. A class uses the implements keyword to implement an interface and must provide implementations for all its methods.
An interface is declared using the
interfacekeyword.An interface cannot be used to create an object.
All methods in an interface are abstract by default.
Methods in an interface do not have a body.
But from Java 8 onward, an interface can contain methods with a body by declaring them as
defaultmethods orstaticmethods.All variables in an interface are public, static, and final by default.
A class uses the
implementskeyword to implement an interface.A class must implement all methods of the interface, otherwise it must be declared abstract.
Interfaces are used to achieve 100% abstraction.
Interfaces support multiple inheritance, which classes cannot do.
Interfaces support runtime polymorphism.
Syntax
interface InterfaceName {

    void method1();
    void method2();
}
Syntax of Implementing an Interface
class ClassName implements InterfaceName {

    public void method1() {
        // implementation
    }

    public void method2() {
        // implementation
    }
}
Example
// Interface
interface Animal {

    void sound();   // abstract method by default
}

// Implementing class
class Dog implements Animal {

    // implementing interface method
    public void sound() {
        System.out.println("Dog barks");
    }
}

// Main class
public class InterfaceDemo {
    public static void main(String[] args) {

        // interface reference, implementing class object
        Animal a = new Dog();
        a.sound();
    }
}
Output
Dog barks
Explanation
In this example, Animal is an interface that declares the sound() method. The Dog class implements the Animal interface and provides the implementation of the sound() method.
We cannot create an object of the interface, but we can create an object of the implementing class using an interface reference. When the method is called, Java executes the method of the implementing class. This shows how interfaces support runtime polymorphism.
Extending an Interface in Java
Extending an interface in Java means one interface inherits another interface. When an interface extends another interface, it gets all the method declarations and variables of the parent interface.
This helps in building a hierarchy of interfaces and allows better organization of related methods. An interface uses the extends keyword to extend another interface, just like classes use extends, but here it is between interfaces only.
An interface can extend another interface using the
extendskeyword.An interface can extend one or more interfaces at the same time, which supports multiple inheritance.
When an interface extends another interface, it inherits all method declarations of the parent interface.
The child interface does not implement methods, it only declares them.
A class that implements the child interface must implement all methods of both parent and child interfaces.
Extending interfaces helps in grouping related functionalities.
Interface inheritance is used only for method declarations, not for implementation.
When one interface extends another interface, static methods are not inherited by the child interface.
A class that implements an interface cannot override the static method of the interface.
A class that implements an interface cannot override the static method of the interface.
Static methods in interfaces are called using the interface name, not through objects or child interfaces.
Multiple inheritance using interfaces can be achieved in two different ways.
Way 1: Class Implementing Multiple Interfaces
In this method, a single class directly implements more than one interface.
Each interface may contain different method declarations.
The class must provide implementations for all methods of all interfaces.
This is the most common and direct way to achieve multiple inheritance in Java.
Syntax
class ClassName implements Interface1, Interface2 {
}
Example Program
interface A {
    void show();
}

interface B {
    void display();
}

class Demo implements A, B {

    public void show() {
        System.out.println("Method from interface A");
    }

    public void display() {
        System.out.println("Method from interface B");
    }
}

public class Test {
    public static void main(String[] args) {
        Demo d = new Demo();
        d.show();
        d.display();
    }
}
Key Points
Class can implement multiple interfaces
implementskeyword is usedAll interface methods must be defined
Direct way of multiple inheritance
Way 2: Interface Extending Another Interface and Class Implementing Child Interface
In this method, one interface extends another interface.
The child interface inherits all methods of the parent interface.
When a class implements the child interface, it must implement methods of both parent and child interfaces.
This achieves multiple inheritance indirectly.
Syntax
interface Child extends Parent {
}

class ClassName implements Child {
}
Example Program
interface X {
    void read();
}

interface Y extends X {
    void write();
}

class Sample implements Y {

    public void read() {
        System.out.println("Reading data");
    }

    public void write() {
        System.out.println("Writing data");
    }
}

public class DemoTest {
    public static void main(String[] args) {
        Sample s = new Sample();
        s.read();
        s.write();
    }
}
Key Points
Interface can extend another interface
extendskeyword is used between interfacesClass implements only child interface
Methods of all interfaces must be implemented
Syntax of Extending an Interface
interface ParentInterface {
    void method1();
}

interface ChildInterface extends ParentInterface {
    void method2();
}
Example
// Parent interface
interface Printable {
    void print();
}

// Child interface extending parent interface
interface Showable extends Printable {
    void show();
}

// Class implementing child interface
class Demo implements Showable {

    public void print() {
        System.out.println("Printing");
    }

    public void show() {
        System.out.println("Showing");
    }
}

// Main class
public class InterfaceExtendDemo {
    public static void main(String[] args) {

        Showable d = new Demo();
        d.print();
        d.show();
    }
}
Output
Printing
Showing
Explanation
In this example, Showable extends the Printable interface, so it inherits the print() method declaration. The class Demoimplements Showable, which means it must implement both print() and show() methods. When the object is created and methods are called, Java executes the implementations provided in the class. This example clearly shows how one interface can extend another interface.
Simple Interface Example (How It Is Accessed)
// Interface
interface Animal {

    // interface variable (public static final by default)
    int LEGS = 4;

    // abstract method
    void sound();

    // static method (Java 8+)
    static void info() {
        System.out.println("Animals have legs");
    }
}

// Implementing class
class Dog implements Animal {

    // implementing interface method
    public void sound() {
        System.out.println("Dog barks");
    }
}

// Main class
public class InterfaceAccessDemo {
    public static void main(String[] args) {

        // ❌ Not allowed
        // Animal a = new Animal();

        // ✅ Interface reference, implementing class object
        Animal a = new Dog();
        a.sound();

        // ✅ Accessing interface variable using interface name
        System.out.println(Animal.LEGS);

        // ✅ Accessing static method using interface name
        Animal.info();
    }
}
Output
Dog barks
4
Animals have legs
Explanation
An interface ka object directly nahi ban sakta, isliye new Animal() allowed nahi hai.
Interface ke abstract methods ko access karne ke liye implementing class ka object banana padta hai, lekin reference interface ka hota hai.
Interface ke variables aur static methods direct interface name se access hote hain, kyunki ye object se related nahi hote.
Very important exam-ready understanding
Interface ka object ❌ nahi ban sakta
Interface method → implementing class ke object se call hota hai
Interface variable → interface name se access hota hai
Interface static method → interface name se call hota hai
Q. Write a program to achieve Multiple Inheritance using Interface Extending Interface
In this method, one interface extends another interface.
The child interface inherits all methods and variables of the parent interface.
When a class implements the child interface, it must implement all inherited methods.
This achieves multiple inheritance indirectly.
// Parent interface
interface Animal {
    // interface variable (public static final by default)
    int LEGS = 4;

    // abstract method
    void sound();

    // static method (Java 8+)
    static void info() {
        System.out.println("Animals have legs");
    }
}

// Child interface extending parent interface
interface Pet extends Animal {
    void type();
}

// Implementing class
class Dog implements Pet {

    // implementing Animal interface method
    public void sound() {
        System.out.println("Dog barks");
    }

    // implementing Pet interface method
    public void type() {
        System.out.println("Dog is a pet animal");
    }
}

// Main class
public class InterfaceAccessDemo {
    public static void main(String[] args) {

        Dog d = new Dog();
        d.sound();
        d.type();

        // accessing static method of interface
        Animal.info();

        // accessing interface variable
        System.out.println("Number of legs: " + Animal.LEGS);
    }
}
Output
Dog barks
Dog is a pet animal
Animals have legs
Number of legs: 4
Key Exam Points from This Program
Interface
Petextends interfaceAnimalClass
Dogimplements onlyPetClass must implement methods of:
Parent interface (
Animal)Child interface (
Pet)
Interface variables are
public static finalInterface static methods are accessed using interface name
Two Ways You Can Write the Code
Way 1: Child reference + Child object
Dog d = new Dog();
d.sound();
d.type();
Way 2: Parent interface reference + Child object
Pet p = new Dog();
p.sound();
p.type();
Both compile, both run, and both work.
Real Difference
The difference is not in object creation.
In both cases, only a Dog object is created in memory.
The difference is in what you are allowed to access.
Rule to Remember (Golden Rule)
Reference decides what you can access
Object decides which implementation runs
Case 1: Child Reference (Dog d)
Dog d = new Dog();
You can access:
All methods of
DogMethods of
PetMethods of
Animal
You are tightly bound to Dog
👉 This is less flexible.
Case 2: Parent Interface Reference (Pet p)
Pet p = new Dog();
You can access only methods of
Petand its parentsYou cannot access Dog-specific methods
Code becomes flexible and general
👉 This is better design.
Why Teachers & Examiners Prefer Parent Reference
1. Supports Polymorphism
Pet p;

p = new Dog();
p = new Cat();
p = new Cow();
Same reference, different objects, same method calls.
2. Reduces Dependency
If tomorrow Dog changes, your code:
Does not break
Does not need modification
You depend on interface, not implementation.
3. Follows Real-Life Meaning
You are saying:
“I don’t care what exact animal it is,
as long as it behaves like a Pet.”
This is clean OOP thinking.
Simple Real-Life Example
Think like this 👇
Pet= Remote controlDog= TV brand (Sony, LG, Samsung)
You hold the remote (interface), not the TV circuit.
When to Use Child Reference
When you need Dog-specific methods
When polymorphism is not required
For small or test programs
Exam-Friendly Conclusion Line
Using a parent interface reference allows polymorphism, flexibility, and loose coupling, whereas using a child reference tightly binds the code to a specific class.
Difference between Abstract Class and Interface
Abstract Class | Interface |
|---|---|
An abstract class can have abstract methods and normal methods. | An interface contains only abstract methods by default (Java 8+ allows default and static methods). |
An abstract class can have method bodies. | Interface methods do not have a body by default. |
An abstract class can have instance variables. | Interface variables are public, static, and final by default (constants). |
An abstract class can have constructors. | An interface cannot have constructors. |
An abstract class allows partial abstraction. | An interface provides 100% abstraction (conceptually). |
A class uses the | A class uses the |
A class can extend only one abstract class. | A class can implement multiple interfaces. |
An abstract class can extend another class. | An interface can extend multiple interfaces. |
Methods in an abstract class can have any access modifier. | Interface methods are public by default. |
Abstract class methods support method overriding. | Interface methods are implemented by classes, not overridden in the same sense. |
Abstract class is used when classes are closely related. | Interface is used when classes are not related but share behavior. |
Abstract class supports inheritance and runtime polymorphism. | Interface supports multiple inheritance and runtime polymorphism. |
Abstract class is used when partial abstraction and code reuse are needed, whereas interface is used to achieve full abstraction and multiple inheritance.
Multiple Inheritance using Interfaces in Java
Multiple inheritance means a class inherits features from more than one parent.
Java does not allow multiple inheritance using classes to avoid ambiguity, but it supports multiple inheritance using interfaces. A class can implement multiple interfaces at the same time, which allows it to inherit method declarations from more than one source.
Java does not support multiple inheritance using classes, but it supports it using interfaces.
A class can implement more than one interface.
Multiple interfaces are implemented using the
implementskeyword, separated by commas.All methods of all implemented interfaces must be implemented by the class.
Interfaces contain method declarations, not implementations (except default/static methods).
Multiple inheritance using interfaces avoids ambiguity because interfaces do not have instance method bodies.
This feature helps Java achieve flexibility and loose coupling.
Syntax
interface Interface1 {
    void method1();
}

interface Interface2 {
    void method2();
}

class ClassName implements Interface1, Interface2 {

    public void method1() {
        // implementation
    }

    public void method2() {
        // implementation
    }
}
Example
// First interface
interface Printable {
    void print();
}

// Second interface
interface Showable {
    void show();
}

// Class implementing multiple interfaces
class Demo implements Printable, Showable {

    public void print() {
        System.out.println("Printing");
    }

    public void show() {
        System.out.println("Showing");
    }
}

// Main class
public class MultipleInheritanceDemo {
    public static void main(String[] args) {

        Demo d = new Demo();
        d.print();
        d.show();
    }
}
Output
Printing
Showing
Explanation
In this example, the class Demo implements two interfaces: Printable and Showable. Both interfaces provide method declarations. The Demo class provides implementations for all the methods of both interfaces. This allows the class to inherit behavior from multiple sources, which is called multiple inheritance using interfaces.
Java supports multiple inheritance using interfaces by allowing a class to implement more than one interface.
Packages in Java
A package in Java is a collection of related classes and interfaces grouped together under a single name. Packages are used to organize large programs, make code easier to manage, and avoid name conflicts. Java provides predefined packages, and programmers can also create their own packages to structure applications properly.
A package is used to group related classes and interfaces together.
Packages help in organizing large projects in a clean and logical way.
Packages help to avoid class name conflicts.
Packages provide access protection using access modifiers.
Java has many built-in packages like
java.lang,java.util,java.io, etc.Programmers can also create user-defined packages.
Packages make code reusable and maintainable.
Access Levels with respect to Packages
Access Modifier | Same Class | Same Package | Subclass (Different Package) | Other Class (Different Package) |
|---|---|---|---|---|
public | Yes | Yes | Yes | Yes |
protected | Yes | Yes | Yes | No |
default (no modifier) | Yes | Yes | No | No |
private | Yes | No | No | No |
publicmembers are accessible from anywhere, even outside the package.protectedmembers are accessible within the same package and also in child classes of other packages.default members are accessible only inside the same package.
privatemembers are accessible only inside the same class, not even within the package.
Packages work with access modifiers to control the visibility of classes and members.
Types of Packages in Java
Predefined packages
These packages are already provided by Java, such asjava.lang,java.util,java.io, andjava.sql.User-defined packages
These packages are created by programmers to organize their own classes.
Syntax to Create a Package
package packageName;
This statement must be written at the top of the Java file.
Example: Creating a User-defined Package
// creating a package
package mypack;

public class Hello {

    public void show() {
        System.out.println("Hello from mypack");
    }
}
Using a Package (Accessing Package Class)
import mypack.Hello;

public class Test {
    public static void main(String[] args) {

        Hello h = new Hello();
        h.show();
    }
}
Output
Hello from mypack
In this example, a package named mypack is created using the package keyword. The class Hello belongs to this package. In another class, the package is accessed using the import statement. After importing, the class inside the package can be used normally.
Defining a Package in Java
Defining a package in Java means creating a namespace to group related classes and interfaces together. This is done using the package keyword. When you define a package, you are telling Java that the class belongs to that package. This helps in organizing code, avoiding class name conflicts, and managing large projects easily.
A package is defined using the
packagekeyword.The package statement must be written at the very top of the Java source file.
Only one package statement is allowed in a Java file.
The package name is usually written in lowercase by convention.
After defining a package, the class becomes a member of that package.
The folder structure is created automatically when the code is compiled properly.
Syntax to Define a Package
package packageName;
Example: Defining a Package
// defining a package
package mypack;

public class Student {

    public void show() {
        System.out.println("Student class inside mypack package");
    }
}
In this example, the statement package mypack; defines a package named mypack. The Student class becomes part of this package. When the program is compiled, Java creates a folder named mypack and places the compiled class file inside it. This is how a package is defined and used to organize classes.
Creating a Package in Java
Creating a package in Java means actually generating the package structure and placing class files inside it. After defining a package using the package keyword, the package is created when the program is compiled. Java can create the package automatically using the compiler, or it can be created manually using folders. Creating packages helps in proper project organization and reuse of code.
A package is created after compilation, not just by writing the
packagestatement.Java compiler creates the directory (folder) structure for the package.
The
javac -doption is commonly used to create packages automatically.The package name and folder name are the same.
Class files (
.class) are stored inside the package folder.Packages can also be created manually, but automatic creation is preferred.
Method 1: Creating a Package using Command Line (Recommended)
Step 1: Write the Java file
package mypack;

public class Hello {
    public void show() {
        System.out.println("Hello from mypack");
    }
}
Save the file as Hello.java.
Step 2: Compile the file
When compiling code that uses packages, the -d flag is often used to specify the output directory for class files, maintaining the package structure. Running a program from a package requires using the fully qualified name of the main class
javac -d . Hello.java
This command creates a folder named mypack and places Hello.class inside it.
Method 2: Creating a Package Manually
In this method, you manually create a folder and place the source file inside it.
Create a folder named
mypack.Place
Hello.javainside the folder.Compile the file normally.
This method works, but it is not preferred for large projects.
When the javac -d . command is used, Java automatically creates the package directory based on the package name written in the source file. The dot (.) tells Java to create the package in the current directory. This ensures correct package structure and avoids errors.
A package is created in Java by compiling a source file containing the
packagestatement, usually using thejavac -dcommand.
Accessing a Package in Java
Accessing a package in Java means using the classes or interfaces that are defined inside another package. Once a package is created, its classes can be accessed from other programs by using the package name. Java provides different ways to access a package depending on how we want to use its classes.
A package is accessed to reuse classes and interfaces defined in it.
To access a package, the class inside the package must be public.
Java allows accessing package classes using import statements or fully qualified names.
Accessing a package helps in code reuse and modular programming.
If classes are in the same package, no import is required.
Method 1: Accessing a Package using import Statement
This is the most commonly used method. The import statement allows us to use classes of a package directly by their class name.
Syntax
import packageName.ClassName;
Example
import mypack.Student;

public class Test {
    public static void main(String[] args) {

        Student s = new Student();
        s.show();
    }
}
Method 2: Accessing a Package using import package.*
This method imports all classes of a package at once.
Syntax
import packageName.*;
Example
import mypack.*;

public class Test {
    public static void main(String[] args) {

        Student s = new Student();
        s.show();
    }
}
Method 3: Accessing a Package using Fully Qualified Name
In this method, the package name is written every time the class is used. No import statement is required.
Syntax
packageName.ClassName object = new packageName.ClassName();
Example
public class Test {
    public static void main(String[] args) {

        mypack.Student s = new mypack.Student();
        s.show();
    }
}
In all methods, the Student class belongs to the mypack package. Using the import statement makes the code shorter and cleaner. Using the fully qualified name avoids importing but makes the code longer. Java allows both methods, and the choice depends on coding style and requirement.
A package in Java can be accessed using the import statement or by using the fully qualified class name.
CLASSPATH in Java
CLASSPATH in Java is an environment setting that tells the JVM where to find class files and packages. When a Java program is compiled or executed, the JVM looks for required classes in the locations specified by the CLASSPATH. If the JVM cannot find a class in the CLASSPATH, it gives a ClassNotFoundException or NoClassDefFoundError. In simple words, CLASSPATH is the path used by Java to locate classes and packages.
CLASSPATH tells Java where to search for
.classfiles and packages.It is used during compilation and execution of Java programs.
CLASSPATH can include directories, JAR files, and ZIP files.
If CLASSPATH is not set, Java searches only in the current directory.
Wrong CLASSPATH setting causes class not found errors.
CLASSPATH can be set temporarily or permanently.
It is different from the
PATHvariable, which is used to locate Java tools likejavacandjava.
How Java Uses CLASSPATH
When you run a Java program, the JVM follows this order to find classes:
Current directory
Locations mentioned in CLASSPATH
Java system libraries
If the class is not found in these locations, Java throws an error.
Setting CLASSPATH Temporarily (Command Line)
set CLASSPATH=.;C:\mypack
This setting is valid only for the current command prompt session.
Setting CLASSPATH Permanently (System Level)
Go to Environment Variables
Add or edit the CLASSPATH variable
Provide paths where class files and packages are stored
This setting remains available even after restarting the system.
Example to Understand CLASSPATH
Suppose the class Student.class is inside the folder mypack.
C:\JavaProject\mypack\Student.class
To access this class from another program, the CLASSPATH must include:
C:\JavaProject
Then Java will automatically search inside mypack.
CLASSPATH is an environment variable that specifies the location where the JVM searches for user-defined classes and packages.
Importing Packages in Java
Importing a package in Java means making the classes of another package available for use in the current program. When a package is imported, we can use its classes directly by their class names instead of writing the full package name every time. Importing packages helps make code shorter, cleaner, and easier to read.
Importing a package allows reuse of classes defined in another package.
The
importstatement is written after the package statement and before the class definition.Importing a package does not load the class, it only makes the class name available to the compiler.
Only public classes of a package can be imported and used.
If two packages have classes with the same name, fully qualified names must be used to avoid confusion.
Ways to Import Packages in Java
1. Importing a Specific Class
This method imports only one required class from a package. It is the most preferred and safe way.
Syntax
import packageName.ClassName;
Example
import mypack.Student;

public class Test {
    public static void main(String[] args) {

        Student s = new Student();
        s.show();
    }
}
2. Importing All Classes of a Package
This method imports all public classes of a package using the * symbol.
Syntax
import packageName.*;
Example
import mypack.*;

public class Test {
    public static void main(String[] args) {

        Student s = new Student();
        s.show();
    }
}
3. Using Fully Qualified Name (Without import)
In this method, no import statement is used. The full package name is written every time the class is used.
Syntax
packageName.ClassName object = new packageName.ClassName();
Example
public class Test {
    public static void main(String[] args) {

        mypack.Student s = new mypack.Student();
        s.show();
    }
}
Using the import statement makes the code shorter and easier to understand. Importing a specific class is better than importing all classes because it avoids name conflicts. Using the fully qualified name removes the need for import statements but makes the code longer and less readable.
Packages in Java can be imported using the import statement or by using the fully qualified class name.
Step 1: Simple example code (creating a package)
File name: Student.java
package mypack;

public class Student {

    public void show() {
        System.out.println("Student class inside mypack package");
    }
}
This line is the key:
package mypack;
It tells Java: “This class belongs to the package named mypack.”
Step 2: Compile the code (this creates the folder)
If Student.java is in this folder:
JavaProject/
Run this command inside JavaProject:
javac -d . Student.java
What Java does:
Reads
package mypack;Automatically creates a folder named mypack
Puts
Student.classinside it
Step 3: Actual folder structure created
After compilation, your folders look like this:
Meaning of this structure
JavaProject/              ← Project / current directory
│
├── Student.java          ← Source file (before compile)
│
└── mypack/               ← Package name (folder created by compiler)
    │
    └── Student.class     ← Compiled class file
📌 Rule to remember (exam + practical)
Package name = folder name
Class inside package = file inside folder
Step 4: Using this package in another class
File name: Test.java (outside mypack)
import mypack.Student;

public class Test {
    public static void main(String[] args) {

        Student s = new Student();
        s.show();
    }
}
Output
Student class inside mypack package
Final clear understanding (very important)
package mypack;→ defines the packagejavac -d . Student.java→ creates the folder automaticallyFolder name = package name
.classfile goes inside that folderPackage is accessed using
import
In Java, a package is created when a class containing the
packagestatement is compiled, and Java automatically creates a folder with the package name.
Why We Use Packages in Java
Packages are used in Java to group related classes together. This helps keep the program organized and easy to understand, especially when the project becomes large.
Packages help to avoid class name conflicts. If two classes have the same name, placing them in different packages prevents confusion.
Packages also provide security and access control. Using packages with access modifiers, Java controls which classes or members can be accessed from outside.
Another reason for using packages is code reusability. Classes inside a package can be reused in other programs by importing the package.
Overall, packages make Java programs clean, manageable, and professional.